Complete Solar + Battery + Truck Backup Power Setup: The $1,405 Off-Grid System Every Prepper Needs
SPECIAL POST EDITION — Red Dawn Survival
Most preppers talk about bugging out. But here is the truth nobody wants to say out loud: 90% of emergencies are not bug-out situations. They are grid-down situations. A storm takes out power for a week. A rolling blackout kills your neighborhood for days. A supply chain disruption means no fuel at the station. You are not running to the woods — you are sitting in your house or your property, and the power is simply gone.
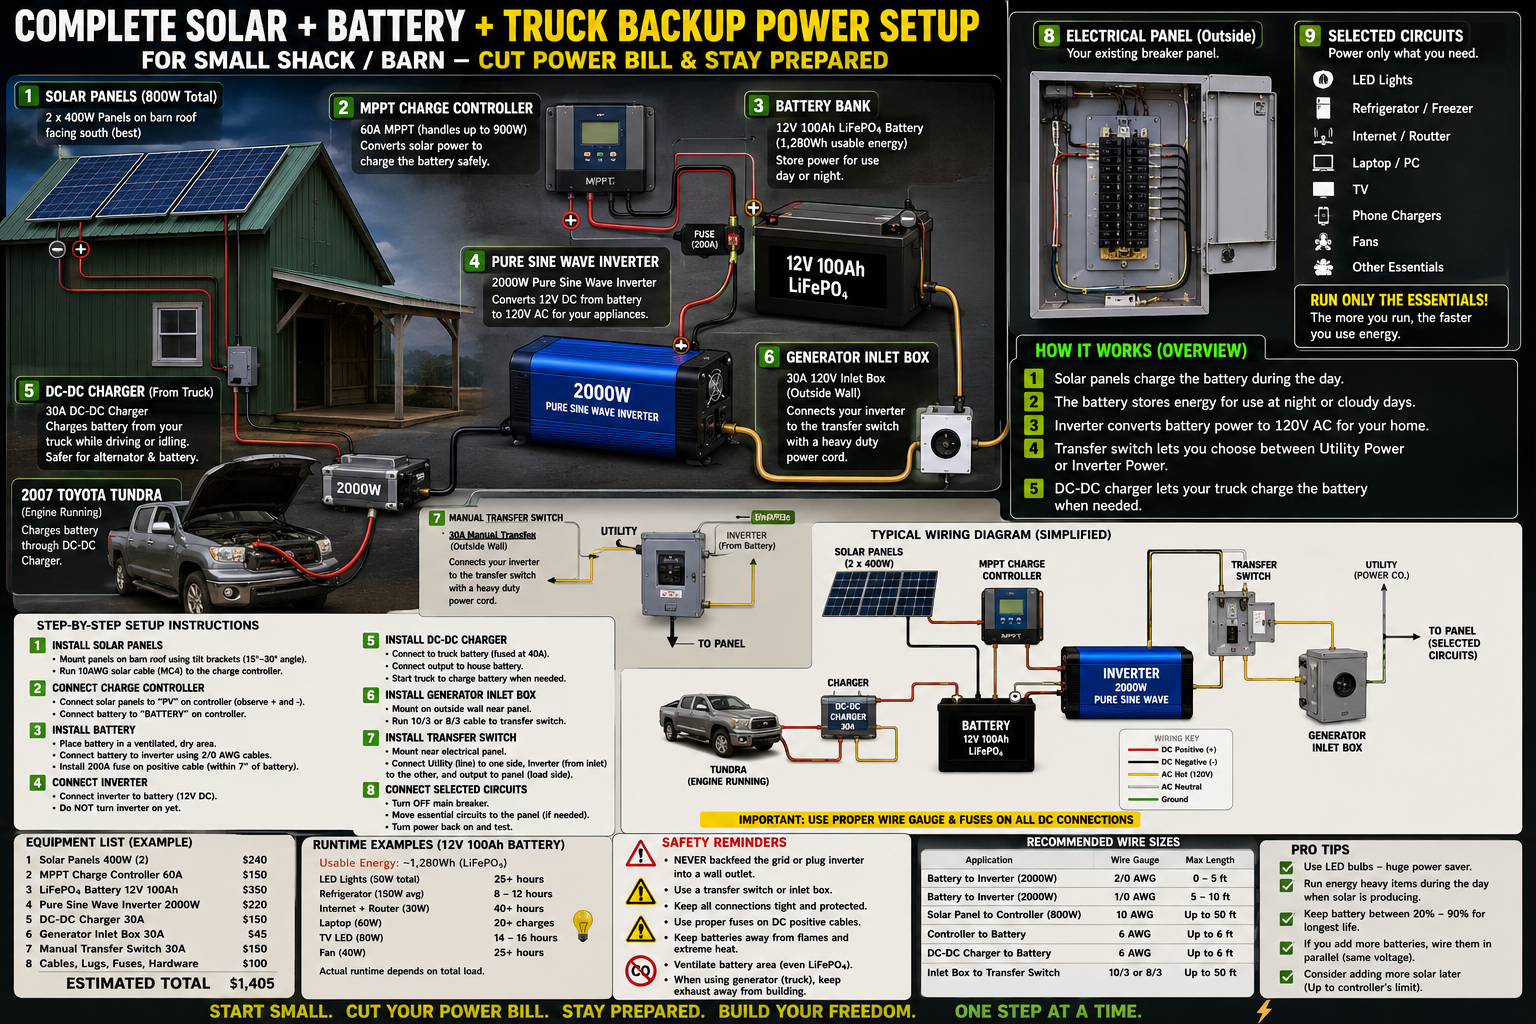
That is where this setup changes everything. What you are looking at is a complete, real-world off-grid power system — solar panels, a lithium iron phosphate battery bank, a pure sine wave inverter, and a DC-DC charger that lets your truck top off the batteries while you drive. Total cost: under $1,500. Total capability: run your essentials indefinitely. This is not theory. This is a functional, buildable system that real preppers are putting on their barns and shacks right now.
Let us break down every single component, why it matters, what it costs, and how to wire it safely.
Why This System Beats a Generator for Long-Term Preparedness
Before we get into components, let us address the elephant in the room: why not just buy a generator?
Generators are loud. They announce to everyone within a quarter mile that you have power and they do not. In a true SHTF scenario, that is a target on your back. They also require fuel — and fuel runs out. During Hurricane Katrina, gas stations were empty within 48 hours. During the Texas freeze of 2021, people were paying $20 a gallon when they could find it at all.
This solar and battery system runs silently. It runs on sunlight, which is free and unlimited. And with the DC-DC truck charger built in, even on a cloudy week you can drive for 30 minutes and put meaningful charge back into the bank. The generator has its place — and this system even has a generator inlet box built in for backup — but solar is your primary, quiet, fuel-free backbone.
Component 1 — Solar Panels: 2 x 400W (800W Total)
The system starts at the roof. Two 400-watt panels mounted on the barn or shack roof at a 15 to 30 degree south-facing angle gives you 800 watts of peak generating capacity. On a clear day in most of the continental US, you will see 4 to 6 peak sun hours, meaning your panels can produce 3,200 to 4,800 watt-hours per day.
That is enormous. Your 100Ah LiFePO4 battery holds 1,280 usable watt-hours. On a good sunny day, you are filling that battery from dead to full and still have capacity to spare. On a cloudy day, you might only get 20 to 30 percent output — but even 800Wh is enough to keep your critical systems alive.
Installation notes:
- Mount with tilt brackets at 15 to 30 degrees, south-facing for maximum year-round production
- Run 10 AWG solar cable (MC4 connectors) from panels down to the charge controller
- Wire panels in parallel to keep voltage at 12V system level
- Use MC4 connectors — do not splice or tape outdoor DC connections
Estimated Cost: $240 for both panels
Component 2 — MPPT Charge Controller: 60A
This is the brain between your solar panels and your battery. The MPPT (Maximum Power Point Tracking) charge controller does two critical jobs: it protects your battery from overcharging, and it optimizes the power coming from the panels to extract maximum efficiency.
A 60A MPPT controller can handle up to 900 watts of solar input — so your 800W array has room to grow. Wire the panels to the PV terminals (observe polarity) and the battery to the BATTERY terminals.
Why MPPT over PWM? A PWM controller wastes 20 to 30 percent of your solar harvest. MPPT tracks the optimal operating point of the panels in real time and can squeeze out 15 to 30 percent more power, especially in cold weather and partial shading. On an 800W array, that is a difference of 160 to 240W — almost a full extra hour of peak production every single day.
What to look for when buying:
- 60A or higher rating for this system
- Built-in display showing voltage, current, and state of charge
- LiFePO4 battery profile support — critical for lithium batteries
- Temperature compensation sensor
Estimated Cost: $150
Component 3 — Battery Bank: 12V 100Ah LiFePO4
This is the heart of the system — and the single most important upgrade you can make over traditional lead-acid batteries. A 12V 100Ah LiFePO4 (Lithium Iron Phosphate) battery gives you 1,280 watt-hours of usable energy. Compare that to a standard AGM lead-acid of the same size, which gives you maybe 600Wh usable because you can only safely discharge AGM to 50 percent.
LiFePO4 advantages for preppers:
- 3,000 to 5,000 charge cycles versus 300 to 500 for lead-acid — this battery will outlast everything else in your system
- 90 percent depth of discharge — you actually use almost all the capacity you paid for
- No maintenance — no watering, no equalization charges, no off-gassing hydrogen gas
- Flat discharge curve — voltage stays stable until nearly empty, so your inverter runs clean
- Safe chemistry — LiFePO4 is the most thermally stable lithium chemistry, far safer than NMC or NCA in a fire scenario
Place the battery in a ventilated, dry area. Wire to the inverter with 2/0 AWG cable for runs under 5 feet. Install the 200A fuse on the positive cable within 7 inches of the battery terminal — this is your system last line of defense against a wiring fault turning into a fire.
Estimated Cost: $350
Component 4 — Pure Sine Wave Inverter: 2000W
The inverter converts your 12V DC battery power into 120V AC — the same power that comes out of your wall outlet. The key words here are pure sine wave. Do not buy a modified sine wave inverter for this application.
Modified sine wave inverters output a choppy, stepped approximation of AC power. It works for simple resistive loads like incandescent bulbs. But it will damage motor-driven appliances (refrigerators, fans, pumps), cause electronics to run hot and fail early, and make audio and video equipment produce noise and interference. For a preparedness system where your refrigerator and medical equipment need to run reliably, modified sine wave is a false economy.
A 2000W pure sine wave inverter gives you enough headroom to run all of the following simultaneously:
- A full-size refrigerator (150W running, 600W startup surge)
- LED lighting throughout the structure (50W)
- Internet router and modem (30W)
- Laptops and phone chargers (60 to 100W)
- A box fan (40W)
- A TV (80W)
That is real-world preparedness power. Connect the inverter to the battery with 2/0 AWG cables and keep the run under 5 feet to minimize voltage drop. Do NOT turn the inverter on until everything else is wired and the transfer switch is properly set.
Estimated Cost: $220
Component 5 — DC-DC Charger: 30A From Your Truck
This is the component that most preppers miss — and it is a game changer. A 30A DC-DC charger connects from your truck battery to your house battery bank. When your truck engine is running, it pushes up to 30A of charging current into your LiFePO4 bank.
Why not wire directly from the alternator? Because modern vehicles have smart alternators and battery management systems that do not play well with direct lithium connections. A DC-DC charger isolates the systems, protects your truck alternator from overload, and provides a proper lithium charge profile to your house battery.
In a grid-down scenario, every drive you take is charging your system. Drive to the store — charging. Drive to check on family — charging. A 30-minute drive at highway speeds can add 15 to 20 amp-hours to your battery. That is the kind of resilience that keeps your family comfortable through an extended outage.
The diagram shows a 2007 Toyota Tundra doing exactly this. Any truck or SUV with a healthy alternator can do the same thing.
Estimated Cost: $150
Component 6 — Generator Inlet Box: 30A 120V
Even the best solar setup has limits. Extended cloudy weather, heavy load demands, or a critical situation that needs surge power — that is where your backup generator plugs in. The 30A 120V generator inlet box mounts on an outside wall near your electrical panel and connects via heavy-duty power cord to the transfer switch.
This gives you three power sources feeding one transfer switch: utility grid, inverter, and generator. You choose which one powers your selected circuits. The inlet box keeps the generator connection safe and weatherproof, and eliminates the dangerous practice of running extension cords through windows or doors.
NEVER backfeed the grid through this system without a proper transfer switch. Backfeeding puts 120V AC on lines that utility workers believe are de-energized. This can kill linemen. The transfer switch in the next section is non-negotiable.
Estimated Cost: $45
Component 7 — Manual Transfer Switch: 30A
The transfer switch is your safety valve and your control center. It physically disconnects your selected circuits from the utility grid and connects them to your inverter or generator. This is what makes the system legal and safe.
Mount the transfer switch on the outside wall near your electrical panel. Run 10/3 or 8/3 cable from the generator inlet box to one side and connect the inverter output to the other. The output feeds your selected circuits in the main panel.
- When grid power is available: switch to UTILITY. Your selected circuits run on grid power like normal.
- When grid is down: switch to INVERTER. Your solar and battery system powers your selected circuits silently.
- When you need surge power: switch to GENERATOR. Fire up the backup and run heavier loads.
Estimated Cost: $150
Component 8 and 9 — Electrical Panel and Selected Circuits
You do not power the whole house or barn off this system — you power only the essential circuits. This is the critical mindset shift for effective preparedness power.
The diagram identifies exactly which circuits to prioritize:
- LED Lighting — 50W total load, runs 25 or more hours on a full battery
- Refrigerator and Freezer — 150W average, 8 to 12 hours per battery charge
- Internet and Router — 30W, 40 or more hours — keep communications alive
- Laptop and PC — 60W, 20 or more charges per battery cycle
- TV — 80W, 14 to 16 hours of news and entertainment
- Phone Chargers — 20 to 30W, essentially unlimited with solar topping up daily
- Fans — 40W, 25 or more hours — critical for comfort and safety in heat emergencies
The rule is simple: run only what you need. Every watt you do not use is a watt that stays in the battery for tonight. Train your family now, before an emergency, on what runs and what does not. That discipline is more valuable than an extra battery bank.
Wire Gauge and Fusing Reference
This is non-negotiable. Use the wrong wire gauge and you create a fire hazard that no fuse can protect against if the overcurrent happens within the wire run rather than at the terminals.
- Battery to Inverter (2000W), 0 to 5 ft: 2/0 AWG
- Battery to Inverter (2000W), 5 to 10 ft: 1/0 AWG
- Solar Panels to Controller (800W), up to 50 ft: 10 AWG
- Controller to Battery: 6 AWG, up to 6 ft
- DC-DC Charger to Battery: 6 AWG, up to 6 ft
- Inlet Box to Transfer Switch: 10/3 or 8/3, up to 50 ft
Fuse every positive DC cable within 7 inches of the battery terminal. Use the correct fuse rating for the wire gauge, not the device rating. When in doubt, go up a wire gauge and down a fuse rating.
Safety Reminders — Read These Before You Touch a Wire
- NEVER backfeed the grid or plug the inverter into a wall outlet
- Always use a transfer switch or inlet box for generator or inverter connections
- Keep all connections tight and protected from moisture and vibration
- Use proper fuses on all DC positive cables
- Keep batteries away from flames and extreme heat
- Ventilate the battery area even with LiFePO4 chemistry
- When using a generator truck, exhaust must exit the building — carbon monoxide kills silently
- Label every wire at both ends before installation
Runtime Examples — What You Actually Get
Using a 12V 100Ah LiFePO4 with 1,280 usable watt-hours:
- LED Lights 50W — 25 or more hours
- Refrigerator 150W average — 8 to 12 hours
- Internet and Router 30W — 40 or more hours
- Laptop 60W — 20 or more charges
- TV LED 80W — 14 to 16 hours
- Fan 40W — 25 or more hours
Running everything simultaneously draws approximately 410W, draining the battery in about 3 hours. But smart load management — running the fridge on a cycle, charging devices during peak sun hours, running fans only at night — stretches your battery across a full 24-hour cycle while the solar array replenishes it the next day.
Pro Tips From the Field
- Use LED bulbs everywhere — the single biggest efficiency win, reduces lighting load by 80 percent
- Run heavy loads during peak sun hours — 10AM to 3PM when solar is producing maximum power
- Add more batteries before more panels — storage is the bottleneck for most setups, not generation
- Wire additional batteries in parallel — same voltage, doubled capacity, no changes to inverter or controller
- Monitor state of charge morning and evening for the first month — learn your specific system in your specific climate
- Keep battery between 20 and 90 percent state of charge for maximum cycle life
- Consider adding more solar later — the 60A controller handles up to 900W, so a third 100W panel is plug and play
Total Equipment List and Cost
- Solar Panels 400W x2 — $240
- MPPT Charge Controller 60A — $150
- LiFePO4 Battery 12V 100Ah — $350
- Pure Sine Wave Inverter 2000W — $220
- DC-DC Charger 30A — $150
- Generator Inlet Box 30A — $45
- Manual Transfer Switch 30A — $150
- Cables, Lugs, Fuses, Hardware — $100
- Estimated Total: $1,405
The Bottom Line
$1,405. That is what it costs to never sit in the dark again. That is less than two months of the average American electric bill. It is less than a mid-range generator that runs on fuel you may not be able to find. It is a fraction of a whole-home solar installation.
And what it buys you is not a gadget. It is not a hobby project. It is fundamental infrastructure — the kind that keeps your refrigerator running during the ice storm, your communications alive during the blackout, your family comfortable and safe when the neighborhood goes dark around you.
Your truck already charges the system every time you drive. The sun charges it every day. And when neither is enough, your generator inlet box is ready. Three charging sources. Quiet operation. No fuel dependency as your primary. Silent. Invisible from the outside. Fully functional.
Start small. Cut your power bill. Stay prepared. Build your freedom. One step at a time.
Red Dawn Survival — Special Post Edition. These are the builds that matter. Print this guide. Build this system. Then help your neighbor build one too.
🛒 Essential Survival Gear

As an Amazon Associate I earn from qualifying purchases.